
In this article, you’ll learn how To autosave media on Facebook Messenger.
Facebook Messenger is a widely-used messaging app that lets people send messages, make calls, and share photos and videos with each other. But, you want to start saving photos or videos shared on the app. It’s easy to do this on your Android, and iOS devices (iPhone).
By enabling the “Auto-Save” feature on Facebook Messenger, you can avoid losing these files and ensure that they are saved automatically.
In this article, we’ll show you how to use the “Auto-Save” feature and save photos you captured in Messenger so that you can save yourself the trouble of manually downloading and saving every media file.
How To Save Photos From Messenger To Gallery
Let’s get right into it. Here’s how to save Messenger photos to your phone’s gallery on Android and iPhone.
- Launch the Messenger app and open the conversation that contains the photo
- Look for the photo and tap to view it.
- Tap the Download icon at the top right corner of the screen to save the photo.
- Once you click on the download, Messenger will show a quick prompt message “Saved image”.
Once you successfully save the photo in your gallery, exit Messenger and open the Gallery app on your phone. Check your album and you’ll find the Messenger folder and the photo/s you saved in the folder.
How to Enable Autosave Media on Facebook Messenger
Before we proceed, we will show you How to:
- Save on capture (Automatically save new photos you took on the Messenger app to your phone gallery)
- Enable auto-save – auto-download all photos and videos to your phone
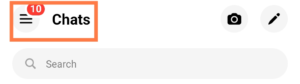
STEP 1: Open the Messenger app on your mobile. Navigate to your profile icon and click to open it.
STEP 2: Save on Capture
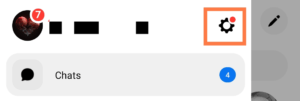
Click on the settings icon and scroll down to preferences.
Before we enable auto-save, let’s first enable the save-on-capture feature.
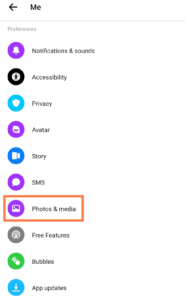
Under the preference category, locate the Photos and Media option. Click on it open. Then, you can enable the save-on-capture option.

STEP 3: Autosave photos and videos
Below the photos and media option under the preference category, click to open free features.

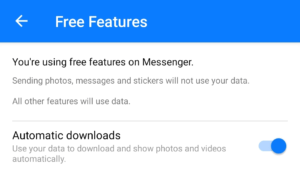
Important: Note, when using free features on Facebook Messenger, you can send photos, messages and stickers without using data. Also, enabling the automatic download option to download, and view photos and videos.
READ ALSO: How To Turn On/off Active Status on Facebook Messenger
STEP 4: Enable autosave media on Facebook Messenger
Toggle the automatic downloads button to enable it.
If you want to save all photos from Messenger to the gallery, then you need to request and download a copy of your Messenger account information. That way all Messenger photos you have sent and received will be downloaded automatically.
Conclusion
Saving media files shared on Facebook Messenger is a simple and useful way to keep your memories safe. By using the “Auto-Save” feature, you can avoid the hassle of manually saving each photo and video.
Enabling this feature is easy, as we have provided a guide on how to do it. Additionally, we’ve shown you how to enable the “Save on Capture” feature so that any new photos you take on Messenger are automatically saved to your phone’s gallery.
By following these autosave media on Facebook Messenger simple steps, you can ensure that all your important media files are saved and easily accessible whenever you need them.
Why can’t I save photos from Messenger?
You need to check your internet and also check your settings and see if Messenger has permission access to your photos and videos.
To do this; Launch the Settings app »»» Apps »»» Manage apps »»» Messenger app »»» Apps permission »»» Photos and videos »»» Allow.
How do I transfer photos from Messenger to my gallery?
You can save the photos from Messenger to your phone’s gallery or PC. Open the photos, then tap download to save photos on your gallery.
How do I forward photos from Messenger?
Aside from messages, you can also forward photos and videos, files, voice messages, and links. To forward photos to another user on Messenger: Open the Messenger app »»» Open conversations »»» Look for the photo and open it »»» Tap more options (three dots) at the top right corner of the screen »»» Forward.
FURTHER READING
- What Does The “Green Dot” On Facebook Messenger Mean?
- How To Remove A Reaction On Facebook Messenger
- How To Unsend A Message On Messenger
- How To Turn On/Off Active Status On Facebook Messenger